


SO YEN MAGAZINE ISSUE #45
PAGE 108
I knew at once what I would need to make it, and got soooo excited!
So, I decided after picking a pair of those khaki slacks from Lowes which I talk about here for another DIY project ;), that I would go and get the stuff from Lincraft and Beads & Beads for the necklace.
And so I bring you another DIY tutorial :)
WHAT YOU'RE GOING TO NEED


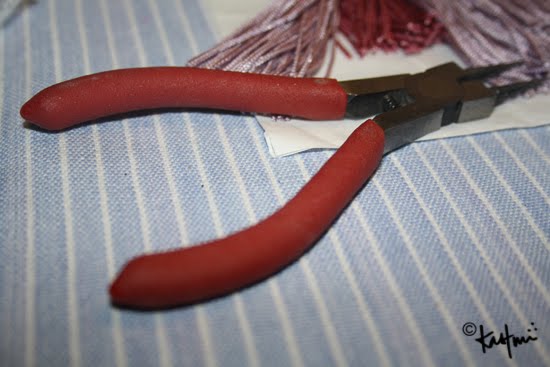
Jump Rings (Beads & Beads), Chains (Beads & Beads) (I used different lengths and types for a funkier look), Some pliers that will help to separate the links to add on to the tassels (Beads & Beads), and some spacer beads (eBay), Tassels (Lincraft).
*BEADS & BEADS
Is a little store here in Brisbane city that really caters to all your jewellery making needs. It is a little exy cause they are practically monopolising this segment of the market, but Lincraft just don't cut it as jewellery making suppliers.
*SPACER BEADS
I do love the skulls from the original picture, but for the life of me I could not find any - not on eBay or in stores... so I decided that I would get these ones instead.
If you can find some large beads like that in stores - then great!
If not, then just search for LARGE SPACER BEADS on eBay.

1. Measure the length that you need for your neck, and cut the chains accordingly. I wanted mine slightly longer, and then I added the clasp.

2. This step is optional, but I wanted to add some extra chains in different lengths and in different stops to give it a bit more of an edge. If you don't want to do this, then obviously skip this part :)

3. Then you want to thread the tassel into the large space beads/skulls. If the tassels are a little longer, then make sure you tie a knot near the top of the bead so that the lengths of the tassels aren't all crazy.

4. Then you just figure out where you want the tasseled bead to go, and just hook the tassels on to your necklace.

AND YOU ARE DONEEEEE!
HERE'S MINE :D
LITERALLY TOOK ME 15/20 MINUTES.


THANKS YEN MAG!
and you! for reading :)
lotttttts of love,
kazz; xo amped+dangerous.
Kastuuurrriiiii!!!! Amazing... yet again... feeling so inspired! What is this magazine, by the way?
ReplyDeleteLove!